엘레베이터 버튼 인식
병원에 로봇을 납품해보자고 한다. 대표 기능으로 층간 이동이 되었으면 한다는데, 말이 쉽지 해결해야 할 문제가 한두개가 아니다. 그러면서 첫번 째 Technology Challenge는 엘레베이터 버튼을 찾아서 눌러야 하는 거란다. 하… 그냥 엘레베이터 시스템에 통신 보드 하나 달면 될 것을 굳이 사람이랑 똑같이 버튼을 누르는 것으로 해보잔다. 쿨하다고… ㅋㅋㅋ 내눈엔 그저 대표적인 오버엔지니어링 케이스. 가격 대비, 기술력 대비 어느 하나 장점이 없다고, 한 시간을 못하는 영어로 설명했지만, 듣는자에게 귀가 없고, 눈도 없다. 앵무새 몇 마리가 동어 반복을 되뇌일 뿐이다. 나같은 일개 연구원 따위의 말은 동서고금을 막론하고 개(?)소리일 뿐…
어째든 엘레베이터 버튼 인식이 요즘 세상에서는 기술적으로 난이도 그리 있는게 아니다. 구글 형님이 만들어 논 Tensorflow Detection API에다가 모아놓은 데이터를 버무려 주면, 비전/이미지 전공 지식도 필요 없이 한방에 빵! ㅋㅋㅋㅋ
여기 설명 해놓은 모든 내용은 github.com/supertigim/elevator_buttons_recognition에 있으니 참고.
[Ingredients]
이미 예전에 얼굴 인식과 로봇 충전소 인식을 해봐서 어렵지 않게 접근이 가능했다.
- 딥러닝 지식 약간
- Python 3.7
- Tensorflow 1.15.2 (GPU 버전으로 해야 Training때 숨 안넘어감)
- Tensorflow Detection API 읽을 수 있는 영어 실력
- 엘레베이터 패널 이미지 많이
- Ubuntu 18.04 (다른 OS는 알아서… ㅎㅎㅎㅎ)
[시작]
Tensorflow Detection API는 설명서가 아주 잘되어 있다. 특히, 나처럼 특별한 걸 Detection 하고자는 사람들은 위해 따로 친절하게 Training Custom Object Detector 섹션이 있기 때문에 이곳을 먼저 살펴 봐야 한다.
대충 정리 해보면, 어떻게 폴더 트리를 만들고 무슨 툴로 데이터셋을 만들것인지 대한 설명이니 각자의 상황에 맞춰 주면 된다.
먼저, conda로 작업 환경을 만들어주자.
    & conda create -tf detection python=3.7
    & conda activate tf
    (tf)& mkdir elevator_buttons_recognition && cd elevator_buttons_recognition
    (tf)elevator_buttons_recognition&
매뉴얼에 있는 폴더 트리와 똑같이 할 필요는 없다. 나는 아래와 같이 구성했다.
    elevator_buttons_recognition
    ├─ addons           # labelImg 툴 저장
    ├─ annotations      # lable table하고 training tfrecord파일이 위치하는 곳
    ├─ models           # tensorflow detection api
    ├─ images
    │   ├─ test         # validation images
    │   └─ train        # train images
    ├─ test_panel       # 나중에 모델 테스트 할 이미지
    ├─ frozen_model     # .pb 파일 넣어두는 곳
    ├─ training         # .config과 training 중에 생기는 파일들이 저장되는 곳
    └─ README.md
[엘레베이터 이미지 모으기]
참고로, 예전 데이터셋 작업을 하면서 알게 된건 이미지 검색의 정확도는 구글 보다는 마이크로소프트의 Bing이 좋다는 것이다. 하지만, 뭘 쓰든 그리 핫(?)한 주제가 아니기 땜에 긁어 모아도 약 100개 정도 밖에 안된다. 그 중에서 다시 이상한 거 몇 개는 버리고 정리를 해서 트레이닝셋으로 70개, Validation용으로 8개 정도만 쓰기로 결정. 너무 적은데, 잘 안되면 더 찾으면 되는거라 일단 이걸로 시작하기로 했다. 당연히 위에 폴더에 맞게 넣어주었다.
[데이터셋 만들기 - 전처리]
딥러닝/AI 개발의 시작과 끝은 데이터셋 가공이다. 이게 다라고 보면 된다. 어짜피 모델은 널려 있고, 잘 만들어져 있고, 성능 비교까지 대부분 다 나와 있어서 그 부분에서 수정할 것은 거의 없다. Detection 하고 싶은 이미지에 대한 작업만 해주면 되는 것이다.
사용한 툴은 매뉴얼에 나와 있는 것 처럼 labelImg을 사용했다. 설치와 실행은 다음과 같이 한다.
    (tf)elevator_buttons_recognition$ mkdir addons && cd addons
    (tf)elevator_buttons_recognition/addons$ git clone https://github.com/tzutalin/labelImg.git
    (tf)elevator_buttons_recognition/addons$ cd labelImg
    (tf)elevator_buttons_recognition/addons/labelImg$ pip install -r requirements ./requirements-linux-python3.txt
    (tf)elevator_buttons_recognition/addons/labelImg$ cd ../..

    # dependacy 라이브러리 설치
    (tf)elevator_buttons_recognition/addons/labelImg$ sudo apt-get install pyqt5-dev-tools
    (tf)elevator_buttons_recognition/addons/labelImg$ sudo pip3 install -r requirements/requirements-linux-python3.txt
    (tf)elevator_buttons_recognition/addons/labelImg$ make qt5py3
    pyrcc5 -o libs/resources.py resources.qrc

    # 실행
    (tf)elevator_buttons_recognition/addons/labelImg$ python labelImg.py
실행이 정상적으로 되면 아래와 같은 화면이 뜨고, “Open Dir”를 눌러서 이미지가 있는 폴더를 설정 하면 모든게 끝! 사용은 간단한데 오른쪽 “Create\nRectBox”를 클릭하고 인식하고자 하는 버튼에 사각형 그리고 “button”이라고 레이블 해주면 된다.
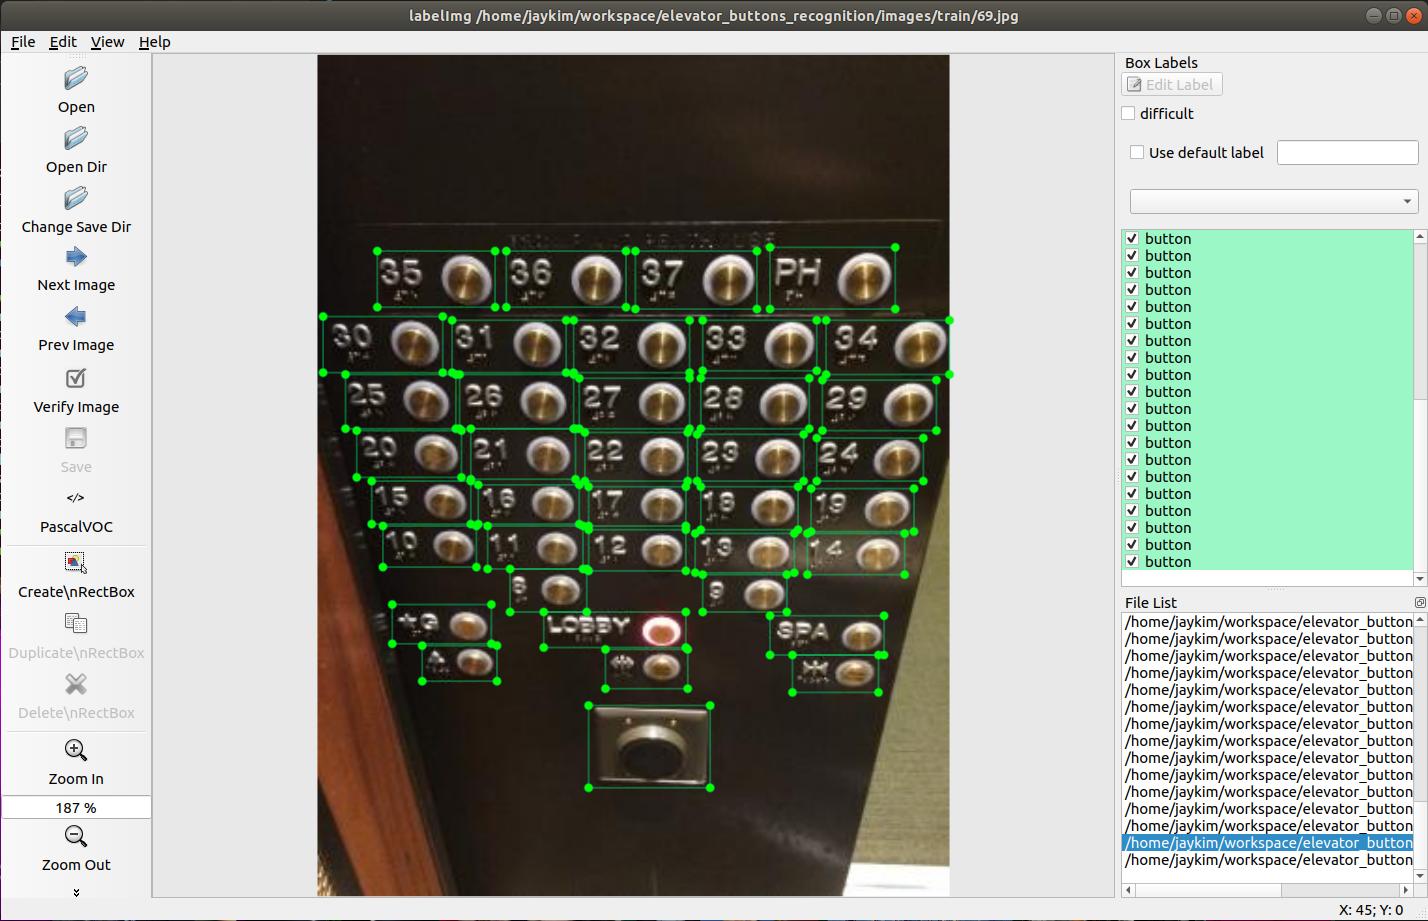
이미지 마다 작업이 끝나면 꼭 저장을 해줘야 한다. 같은 폴더에 xml파일로 저장이 된다. 이게 정말 시간이 많이 걸린다. 하다보면 화도 날꺼다. ㅎㅎㅎㅎ 사실 100장 이상 더 찾을 수 있었지만, 심신의 건강을 위해 적당한 선에서 멈췄다. 대충 100장 하는데 하루 걸림.
참고로 레이블링 할때, 몇층인지 보여주는 표시도 “sign”으로 같이 했다.
[데이터셋 만들기 - 후처리]
Tensorflow Detection API를 쓰려면 xml을 tf-record 형태로 변경을 해주어야 한다.
    # tensorflow detection API 다운로드
    (tf)elevator_buttons_recognition$ git clone https://github.com/tensorflow/models.git

    # protobuf 설치 해야함
    (tf)elevator_buttons_recognition$ sudo apt-get install protobuf-compiler
    (tf)elevator_buttons_recognition$ cd models/research

    # 요건 한번만 해주면 됨
    (tf)elevator_buttons_recognition/models/research$ wget -O protobuf.zip https://github.com/google/protobuf/releases/download/v3.0.0/protoc-3.0.0-linux-x86_64.zip
    (tf)elevator_buttons_recognition/models/research$ unzip protobuf.zip
    (tf)elevator_buttons_recognition/models/research$ protoc object_detection/protos/*.proto --python_out=.

    # 터미널 창 열 때 마다 해주어~!
    (tf)elevator_buttons_recognition/models/research$ export PYTHONPATH=$PYTHONPATH:`pwd`:`pwd`/slim
위의 내용은 conversion tool을 쓰기 위해 환경 설정을 해준 것이고, 매뉴얼에 따라 xml –> csv를 하고 csv –> .record로 변경 해준다. file들은 매뉴얼에 있는 것 같다 복사 & Paste로 만든거다.
    # Convert xml to csv
    (tf)elevator_buttons_recognition$ python xml_to_csv.py -i ./images/train/ -o ./annotations/train_labels.csv
    (tf)elevator_buttons_recognition$ python xml_to_csv.py -i ./images/test/ -o ./annotations/test_labels.csv

    # Convert .csv to .record
    (tf)elevator_buttons_recognition$ python generate_tfrecord.py --csv_input=./annotations/train_labes.csv --output_path=./annotations/train.record --img_path=images/train/
    (tf)elevator_buttons_recognition$ python generate_tfrecord.py --csv_input=./annotations/test_labes.csv --output_path=./annotations/test.record --img_path=images/test/
다음으로는 트레이닝과 모델 Frozen 인데, 이 내용도 다 매뉴얼에 있다. 혹시나 해서 말해두지만, training은 무조건 GPU로 하자. 100장을 200,000 에폭 했더니 GPU를 썼음에도 2-3시간 걸렸다.
그리고, tensorflow gpu 설치는 공홈 GPU 서포트 사이트에 있는 ubuntu 18.04를 참고해서 하자. 무시하고 했다가 2시간 날렸음. 아래의 파일들도 매뉴얼에 다 나와 있음.
    # 트레이닝
    (tf)elevator_buttons_recognition$ python train.py --logtostderr --train_dir=training/ --pipeline_config_path=training/ssd_inception_v2_coco.config

    # (Optional) 텐서 보드로 상태 확인
    (tf)elevator_buttons_recognition$ tensorboard --logdir=training

    # .pb file로 변경: model.ckpt 파일들과 checkpoint 있어야 함
    (tf)elevator_buttons_recognition$ python freeze_model.py --input_type image_tensor --pipeline_config_path ./training/ssd_inception_v2_coco.config --trained_checkpoint_prefix ./training/model.ckpt-87666 --output_directory ./training
생성한 pb파일은 frozen_model 폴더에 옮겨 놓고 (아마 옵션에 있었을텐 안찾아 봤음… 귀차니스트.. -.,-) 아래 파일 실행하면 끝! ㅎㅎㅎ
(tf)elevator_buttons_recognition$ python inference.py
결과는 생각외로 괜찮다.
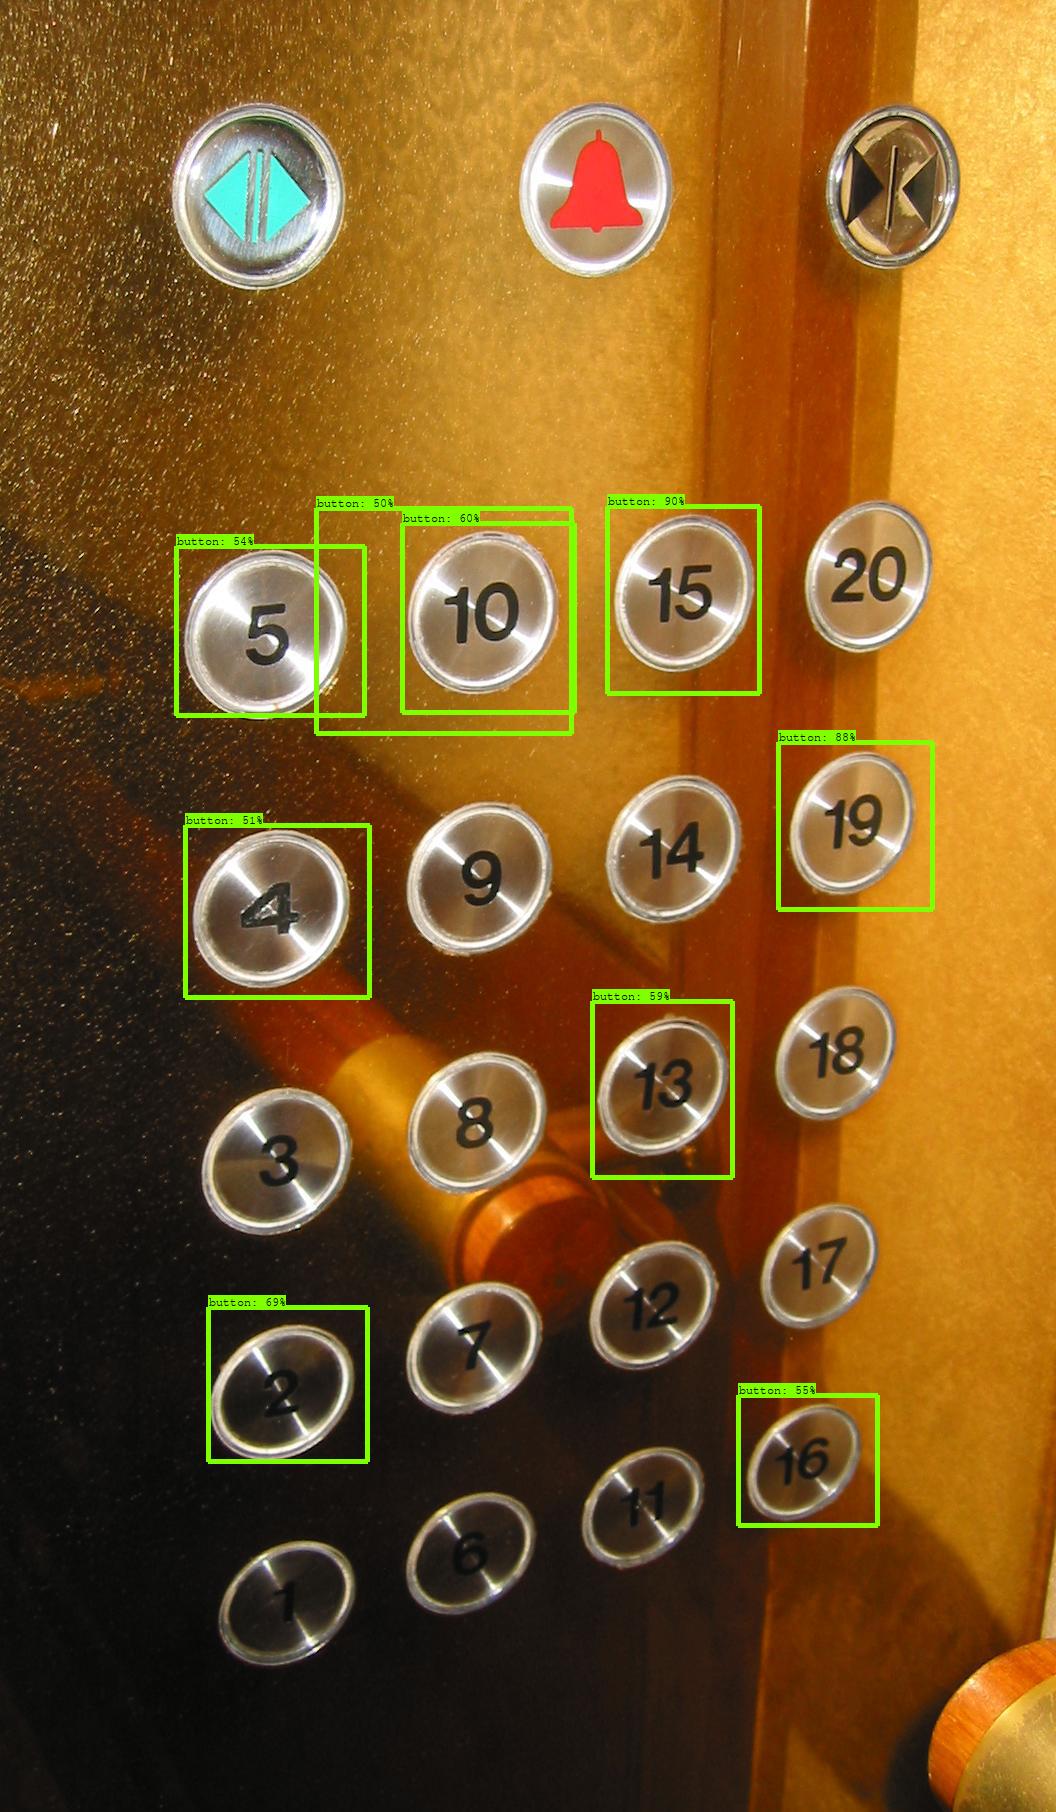
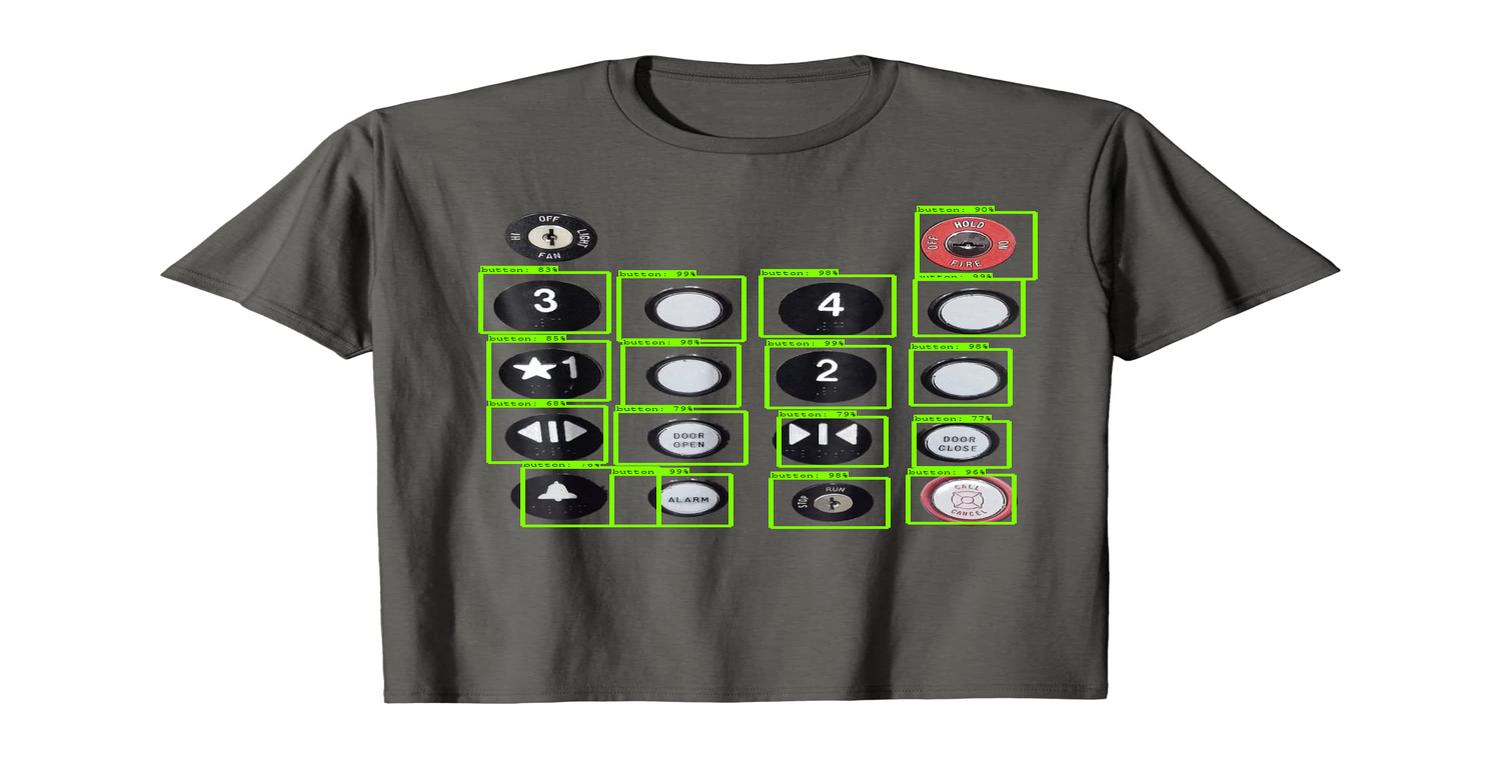
몇 개 Detection 되지 않은 버튼이 있지만, min_score_thresh 값을 조정 해주면 된다. (default=.5) 근데, 이것보다는 데이터셋을 좀 더 확보하거나 hyper parameters를 조정해서 새로 훈련 하는게 더 좋을 것이다. 어째든, Mission Completed!!!